Stop feeding, start climbing: The resource discipline that turns Bastion from a ult battery into a ranked carry
Four habits that cost you games on Bastion and the matchup reads that separate a climbing tank from a plateauing stat-padder
TL;DR
- →Recon mode is your primary fire now — stop treating it like a waiting room
- →Artillery overhealth decay is your license to dive — use it
- →Early cancel Assault form the second you have no target — cooldown discipline wins fights
- →Manual cancel is the same read, said again because it's that important — stop watching paint dry
- →Recon mode wins duels now — stop cowering when your transform is on cooldown
- →Lindholm Explosives are for close maps — don't pick them on Junkertown
The Bastion plateau is a resource problem, not a skill problem
If you consistently drop games you should win on Bastion, you're not playing a weak hero — you're playing with weak timing. The difference between a climbing Bastion and a hardstuck one isn't aim; it's the discipline to cancel transforms you don't need and the matchup reads that stop you from being farmed.
The ranked ladder rewards Bastion players who treat every cooldown as a resource, not a timer. Watch the climb: the players who sit in Assault form staring at doorways no one walks through are the same ones wondering why their ult charge rate is a crawl. The footage below shows exactly where that time leak lives — and how to patch it with a single button press.
But resource discipline only goes so far if you don't know which matchups you win and which ones you need to respect. The videos of Ana, Dva, Ramattra, Reaper, Zarya, and Brigitte aren't random content drops — they're each a live demonstration of a specific threat pattern that, when you understand it, becomes a trade you can calculate instead of a panic you eat. Your Bastion kit has answers: , Tactical Grenade, Recon uptime, early cancel tech. The question is whether you're applying them at the right tempo.
The through-line is simple: stop treating Bastion's Assault form as your only win condition. Recon mode does real damage now. Early cancel does real tempo now. The matchup plays are mechanical, not magical. Learn the reads, execute the discipline, and your SR stops being a hostage to your team enabling you.
Recon mode is your primary fire now — stop treating it like a waiting room
The recon damage buff is the single biggest shift in Bastion's pacing this patch. 23 damage per bullet at recon's fire rate means you apply threatening pressure at range without burning your transform. The players who sit idle in Assault form for 6 seconds of zero value are losing a full clip of recon damage and the ult charge that comes with it. Use recon to farm ult, force rotations, and only transform when you have a confirmed angle or a teamfight to win. If you're not shooting in recon, you're not playing Bastion — you're a stationary ult battery.
Artillery overhealth decay is your license to dive — use it
Losing overhealth at half speed during Artillery means you can fly into the enemy backline and eat cooldowns before your shells even land. The overhealth pool isn't just a shield — it's a window to displace the enemy team with the threat of splash damage. Leap onto their supports, force the Reaper to wraith early, make the Ana nade herself. Your shells become a zoning tool while your body becomes a pressure point. The perk doesn't make Artillery safer — it makes it aggressive. If you're hanging back spamming shells from Narnia, you're wasting the entire point of the minor perk.
Early cancel Assault form the second you have no target — cooldown discipline wins fights
Every second you sit in Assault form scanning an empty lane is a second you delay your next transform. Enemies will hide the moment they hear your — they know the timer. Beat them to it: press the ability button to cancel the moment your crosshair has no red. This isn't a niche tech, it's the difference between having Assault form for every enemy push and watching it cooldown while your team dies. Make it a reflex. If you're not cancelling early, you're farming downtime, not uptime.
Manual cancel is the same read, said again because it's that important — stop watching paint dry
This video exists because the dev team saw how many Bastion players sit in turret form and do nothing. The fact that I have to write a second section on the same cancel tech tells you exactly where the ranked playerbase is bleeding value. Pressure the ability button the instant you lose vision — no hesitation, no 'maybe they peek.' Your Assault form cooldown starts the moment you exit. A faster exit means a faster next transform. This is not an optional optimization; it's how you stay in tempo with the game's pace. Make it your new default.
Recon mode wins duels now — stop cowering when your transform is on cooldown
With the 20% DPS buff, recon Bastion out-duels half the roster in straight aim checks. The instinct to hide behind cover and wait for your cooldown is what gets you farmed by flankers who know your pattern. Turn and shoot. The damage per second on recon is real enough to force a Reaper to wraith or a Tracer to recall. You are not helpless in recon — you are a hitscan threat with 200+ effective HP and a grenade that boops. The enemy expecting a free kill on a cooldown-dependent Bastion is the enemy walking into a matchup they lose. Stand your ground.
Lindholm Explosives are for close maps — don't pick them on Junkertown
Explosive shells trade raw Assault form DPS for mobility and burst window damage. On maps where fights happen inside 15 meters — King's Row, Lijiang, Nepal — the AOE lets you punish grouped enemies and the extra movement is a get-out-of-jail free card when you're dove. But on a map like Junkertown or Havana, you lose the long-range lethality that makes Assault form oppressive. Read the map, not the patch notes. If the fight is going to be in your face, take the explosives. If it's going to be a sightline war, keep the raw damage.

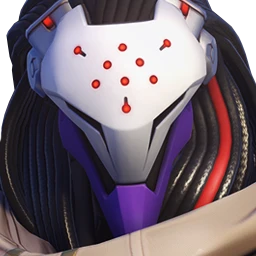
Ana's Nano on a Bastion ult is a death sentence — shield break or reposition
Ana· SUPPORT // TACTICIAN→The video shows exactly what happens when an Ana decides to throw Nano on a Bastion in Artillery: the damage reduction makes your shells impossible to survive, and the damage boost deletes anything in the AOE. This is not a counterplay moment — it's a prediction read. If Ana has Nano and Bastion has Artillery, your only option is to track that combo and either break line of sight before she hits Q or bait the Nano with a fake transform. The threat isn't the Bastion ult — the threat is the Ana who times her Nano to match it.
Save your Tactical Grenade to boop the Nano-Bastion off high ground or into a corner where his line of sight is restricted. FoV control is the only hard counter to infinite-range AOE damage.

D.Va's ammo perk is a mobility trap — punish her for wasting Boosters
D.Va· TANK // INITIATOR→D.Va players who use the ammo generation perk as a quick reload are giving you a read: they're out of Boosters for the next three seconds. That's your window to rotate onto her backline or force her to eat damage she can't matrix away. The video shows the perk's uptime value, but the threat to you is a D.Va who saves her ammo gen for aggressive rotations — meaning she'll have Boosters AND full ammo when she dives you. Don't let her reset for free. Call out her cooldown usage and punish the low-mobility moments.
Wait for D.Va to burn her Boosters, then transform into Assault form at an off-angle she can't reach. Her Defense Matrix has no answer to sustained beam damage — stay out of melee range and force her to disengage or die.
Ramattra's mid-air Vortex pulls you out of Recon — respect his range
Ramattra· TANK // STALWART→The Vortex detonation now catching airborne targets means your Recon mode strafe jumps get yanked into Nemesis form's punching range. The 15 explosion damage isn't the threat — it's the displacement that sets you up for a punch combo that shreds your hitbox. The moment Ramattra has his shift off cooldown, your jump pattern is a liability. Stay grounded, keep distance, and do not let him close the gap while Vortex is in play. One missed Vortex is your window to punish him in Assault form.
Stay in Recon at maximum falloff range and track his Vortex cooldown. The moment he throws it and misses, transform into Assault form and delete him before he can close the gap. reduces his punch damage during Nemesis — trade into him.

Reaper's health pack passive doubles his sustain — do not let him rotate freely
Reaper· DAMAGE // FLANKER→Mini health packs healing for 150 instead of 75 means a Reaper in your backline doesn't need to retreat to his supports — he can take two packs and re-engage with full HP. The threat isn't his shotguns; it's his ability to stay in your space indefinitely. If you don't pressure health pack locations and force him to use Wraith to escape, he will win the attrition war. Your job is to deny him access to those packs by holding angles that cover them.
Place your crosshair on health pack locations when you rotate into an off-angle. If Reaper tries to take one, punish him with Recon fire before he can wraith. Force him to use Wraith to reach the pack, then transform and delete him while his escape is on cooldown.

Zarya's energy farm from Junker Queen combos means you must isolate her
Zarya· TANK // BRUISER→The video shows Zarya feeding charge by bubbling a Junker Queen who would have eaten a Carnage hit — that's a two-tank combo that turns a 0-energy Zarya into a 40-energy monster. The threat to you is a Zarya who plays aggressively without burning her own cooldowns, because she's leeching charge from teammate plays. If you see a Zarya playing close to a Junker Queen, don't shoot the bubble — it's feeding her. Instead, swap targets to the Queen or wait for the bubble to expire.
Do not shoot Zarya bubbles. Ever. Use Tactical Grenade to boop her away from her team and into an isolated angle where she has no one to bubble for. Her energy stays low, and your Assault form shreds her after the bubble expires.

Brigitte farming Inspire off your turret means you're healing her team for free
Brigitte· SUPPORT // SURVIVOR→Brigitte hitting your Assault form with her flail or Shield Bash activates Inspire and heals her entire team without her taking any risk. You are literally feeding her value by existing in turret form within her melee range. The moment you see Brigitte swinging at your transform, you are trading your uptime for her team's sustain — and you lose that trade. Cancel early, reposition to an angle she can't reach, and force her to expose herself to keep Inspire up.
Never transform into Assault form within Brigitte whipshot range (20 meters). If she wants to hit you, she has to walk into your lethal cone. Use Recon to poke her from outside Inspire's trigger zone, and only transform when she has been forced to shield and retreat.