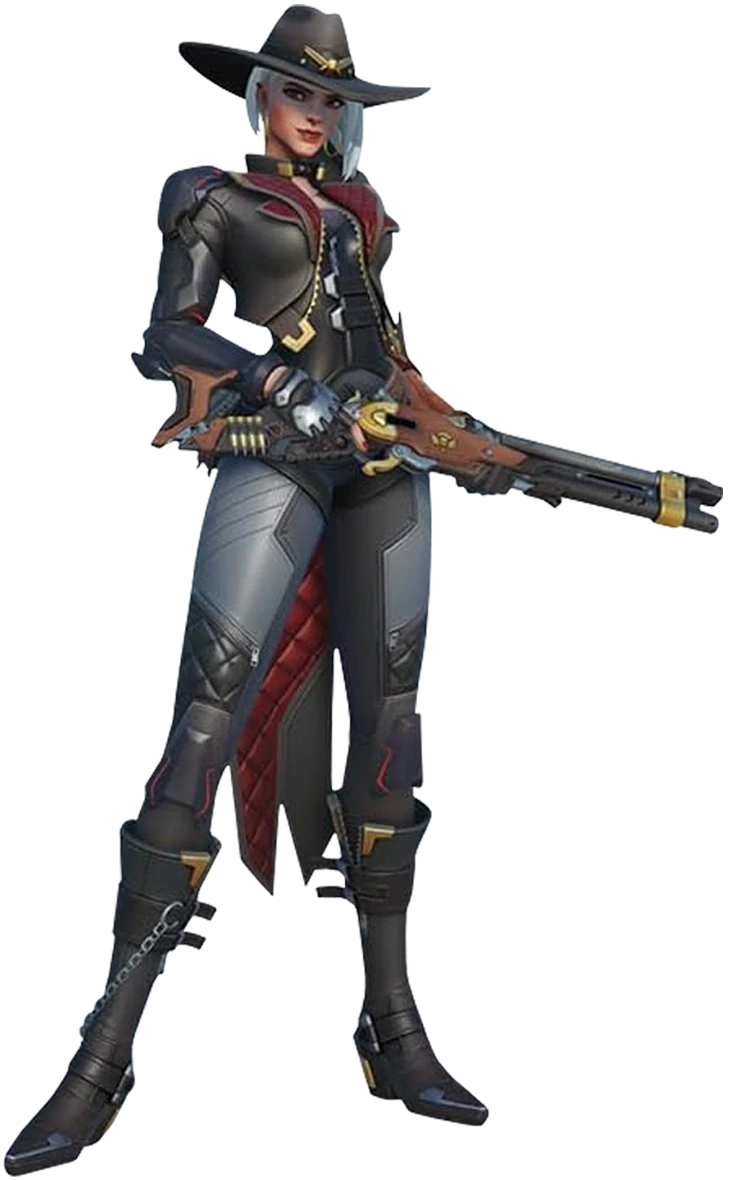
The habits costing you games on Ashe — deliberate resource and timing discipline
Stop farming damage and start farming wins: the sharp tempo decisions that separate climbing Ashes from the ones who plateau.
TL;DR
The habits costing you games on Ashe
You're not losing because your aim is bad. You're losing because your timing is lazy. Let's fix that.
Every Ashe player can hit a headshot. Every Ashe player can toss a . The difference between a 55% winrate and a 48% winrate isn't mechanical ceiling — it's how you sequence your resources under pressure. This guide assumes you can aim. What it assumes you can't do yet is
You're playing Ashe like a worse Soldier: standing in main, farming poke damage, building Bob for a fight you already lost. The real Ashe win condition is tempo abuse. You control the pace of engagements by choosing when to zoom in, when to hipfire, when to , and — most importantly — when to hold your ult. Bob isn't an ultimate, it's a swing timer. Use it to retake a point your team already lost, and you turn a lost fight into even resources. Use it to extend a won fight, and you just wasted your win condition.
The second plate is positioning discipline. Ashe's gives you a full reset on your bad decisions every 10 seconds. The problem is that most players treat it as a rotation tool instead of a pressure escape. You should be on an off-angle before you even fire your first shot. If you're peeking main lane, you're giving the enemy tank free ult charge and letting their support line heal for free. The footage below shows exactly what that looks like in practice — and what happens when you force it.
Two-tap the bike before she touches high ground
Shion motorcycle gives her one thing: speed to close distance. But it doesn't give her verticality. If you're on high ground on Dorado first, she can't reach you without dismounting and taking the stairs. So don't let her. Two scoped shots to the head ignore her overhealth and sustain — she never gets value from the bike if she's dead before she arrives. Hold your angle, wait for the charge, and punish the predictable path. This is a pure matchup of positioning over movement.
The hipfire weave breaks the tank's posture
You know the scoped shot cooldown is a bottleneck. This combo — one scoped, three hipfire, one scoped — bypasses that bottleneck without losing burst. Against tanks, this is lethal because they expect the slow rythm of full-zoom Ashe. You punish their face-tanking with a higher rate of fire, and the hipfire rounds are accurate enough at close-mid range to pressure their head hitbox. This isn't an every-fight macro; it's a micro cadence for when you need to force a tank to respect your damage or die.
Shoot what you want Bob to delete
Bob is dumb, but he's not stupid. If you're actively shooting a target — a Torb turret, a support, a tank — Bob will shift his aggro to that same target. This means you can manually focus fire by swapping your crosshair. Don't just deploy Bob and hope. Ping or shoot the priority target first, then call Bob. He becomes a surgical deletion tool instead of a random damage bot. This is especially critical against deployable-heavy comps where Bob can waste time on a Molten Core turret while the actual fight happens behind him.
The off-angle dynamite is your real engage
Main lane is death. You know it, I know it, the enemy team knows it. So why are you standing there? Rotate to an off-angle before you fire your first shot. From that off-angle, isn't poke — it's pressure. It forces the backline to reposition or burn cooldowns, and it forces the tank to turn away from your team. If you catch them looking elsewhere, that is a free 90 damage and a burn that denies healing for four seconds. This clip shows exactly how that sequence works: reposition first, then throw the grenade, then shoot. Not the other way around.
Bob is a pause button, not a win button
Bob is not a teamfight win condition. He's a freeze-frame. If your team loses a fight or is scattered, deploy Bob on point to buy you 10 seconds of regroup time. He doesn't need kills — he needs to contest. Even if he dies immediately, the time he stalls is enough for your team to respawn and re-engage as a full six. Stop treating Bob like a damage ult. Treat him like a tactical timeout. The best Ashes use Bob when they're losing, not when they're winning.
Don't shoot the tank — shoot the squishy looking at the tank
This sounds obvious, but watch your replays. Most Ashe players default to the biggest hitbox. That's free ult charge for the enemy supports. The correct read is: find the exposed support or low-health DPS who's out of position, and delete them in two shots. The clip shows exactly what that looks like — a Mercy peeking a corner, a Zen charging a volley, a Tracer low after a dive. You don't need to be a flanker. You just need to be patient enough to wait for the right target to show their neck.

Nano Shion is a ticking time bomb — shoot the baby
Ana· SUPPORT // TACTICIAN→Ana Nano Boost is the single biggest threat to your team when paired with Shion ultimate. The damage reduction turns Shion into a near-unstoppable Wrecking Ball, and the damage boost makes her one-shot potential insane. The footage shows exactly how this combo works: Ana pockets Shion during her ult, and suddenly your tank melts. The problem is that Shion is still Shion — she's vulnerable when not on the bike, and she's extremely predictable in her movement. The counter isn't to kill Ana first; it's to kill Shion before she can get value.
The moment you see Nano land on Shion, immediately backwards to create distance and the landing zone. Shion will dismount or be forced to take the burn. Two scoped headshots cancel her before she reaches your backline. If she ults on bike, you can't two-tap her — so don't let her ult on bike: pressure her with before she presses Q.
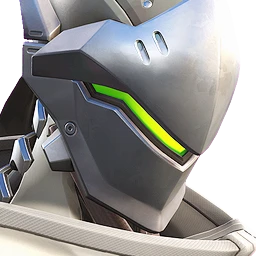
Genji's dash is his only escape — bait it, then kill him
Genji· DAMAGE // FLANKER→Genji players are taught to use dash as a finishing tool, not an escape. This is correct — but it means he's extremely vulnerable once his dash is on cooldown. The footage shows Genji committing his dash to kill a low-health target, then having zero mobility for the next 8 seconds. That's your window. Ashe can punish this because you have range and burst: you don't need to close distance. If he dashes in, he can't dash out. You have a full 8 seconds to land two shots before he can touch you again.
When Genji dashes toward you, do not panic. ADS, land one body shot to force his deflect, then time your second shot for the frame his deflect ends. If he doesn't deflect, just two-tap him. Either way, he dies or burns Swift Strike to escape — and if he dashes out, he's useless for 8 seconds.
Break the lamp before you break the Baptiste
Baptiste· SUPPORT // TACTICIAN→Baptiste win condition is Immortality Field in a grouped comp. The footage shows him saving his team from burst damage with perfect timing. As Ashe, you have the range and burst to break the lamp before it saves anyone. One + one scoped shot kills the lamp instantly. If you wait until the lamp is out, you've already lost. Your job is to pre-emptively break the lamp when you see Baptiste group his team — not after they get saved.
the ground near Baptiste team. As the lamp deploys, fire one scoped shot at it. The lamp has 150 HP — a plus one shot kills it before it can save anyone. This forces Baptiste to either reposition or die without his safety net.

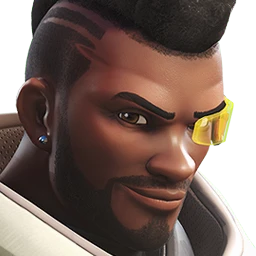
Cassidy's range is his weakness — stay past 20 meters
Cassidy· DAMAGE // SHARPSHOOTER→Cassidy perk selection determines his playstyle: in 5v5, he takes the long-range perk, which gives him better poke but still limits his effective range to about 25 meters. In 6v6, he takes fan damage for tank shredding. The footage shows how his range defines his role. As Ashe, you outrange him by a significant margin. If you're standing past 25 meters, he can't land consistent damage and his Flashbang is useless. The counter is simple: don't let him close. Use to pressure him when he tries to rotate, and never take a fight inside his optimal range.
Keep distance at 25+ meters. his approach path. If he rolls toward you, backwards and continue shooting. He has no way to catch you unless you let him. If he does land a shot, your range advantage still lets you trade favorably.
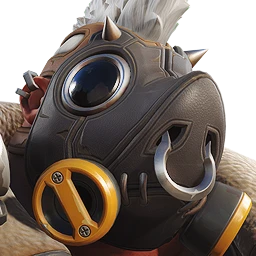
Hook is a death sentence — so don't let him see you
Roadhog· TANK // BRUISER→Roadhog Chain Hook can pull Shion off her bike, but more importantly, it can pull you. The footage shows how the hook goes through the bike model to cancel her mobility. For you, that means one hook = one death. You can't survive a Hog combo even with full HP. The counter isn't mechanical — it's positional. Never peek a lane where Hog has angle. Use off-angles where he can't hook you without exposing himself to your and team fire. If he does hook you, you already made a mistake three seconds ago.
Avoid Hog's sightlines entirely. Play off-angles where he can't hook you without eating burn. If you must peek, do it from behind a corner so you can instantly break LOS. Never stand still — strafe unpredictably between shots to make his hook miss.
Winston's deployable damage is the distraction — you are the real target
Winston· TANK // INITIATOR→Winston Tesla Cannon now does extra damage to deployables, but the footage shows something more important: Winston dive is about killing supports, not turrets. He will jump on you, bubble, and zap. The deployable damage is a bonus, not his win condition. As Ashe, your is your get-out-of-jail card. The moment you hear Winston jump pack, away from him before he lands. If you get bubbled, you're dead. The counter is to never let him land on you in the first place.
the moment you hear his jump pack activation. If he lands on you, you've already lost. the ground where he lands to force him to either take burn or drop bubble early. If he bubbles, step inside it — his Tesla does less damage up close and you can headshot him easily.